
Now that I have my Garden Thyme Greenhouse from Montana Shed Center all set up and growing pretty flowers and vegetables its time to move on to the outside! I have always wanted raised garden beds, as they do very well here in Wyoming.
I’m no stranger to DIY’s but this is my first attempt at raised garden beds. I created a simple version so any beginner can master these!
The materials below are for a 6 foot by 3 foot box, however you can choose whatever size you want! The build instructions will work for any size. I also went with cedar, which is more expensive but they weather better and will last longer. I also did not go with treated since I am growing food in the boxes and don’t want the chemicals in the soil.
Tools:
- Drill/ driver
- Chop Saw (this one is optional! If you do not own one or you aren’t comfortable, the lumber yard can help with cuts!)
- Nail gun (or you can use a hammer and some brad nails)
Materials:
- 6 1x6x6
- 6 1x6x3
- 4 4×4 cut 18 inches
- Exterior wood screws (I went with 9x2s)
- 6 1×2 cut 12 inches (this is to attach to the inside to support the boards)
Instructions:
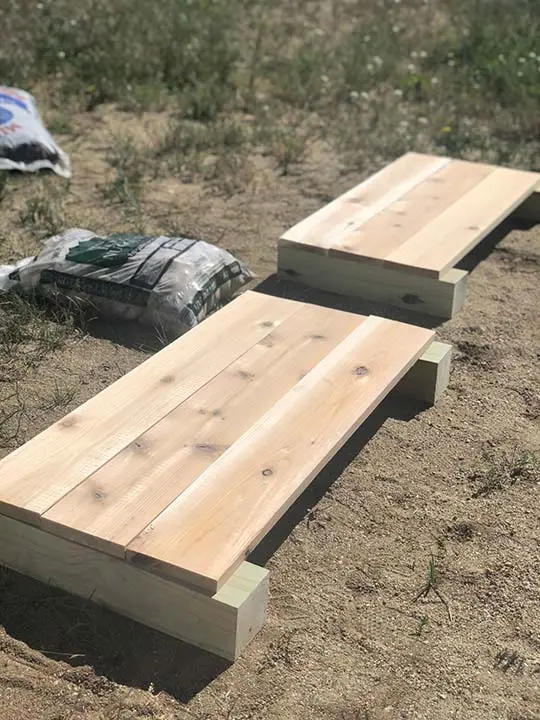
Once you’ve got all of your wood cut, lay your 4x4s out next to each other and space them apart. We are going to start with our 3ft sides first. Place the 1x6x3 boards across the 4×4 posts with the 4×4 posts on either end of the boards (see picture below)
Make sure your boards are even and the 4×4 is even with the ends of the board. Start with your top board, drill your holes first, this prevents splitting, then drill in your screws. I use 2 screws on each side of the boards. Repeat with the two others below the first board.
You will see the 4×4 is extended past the boards at the bottom, this is to allow you to set the bed where you want and the “feet” will stay in place.
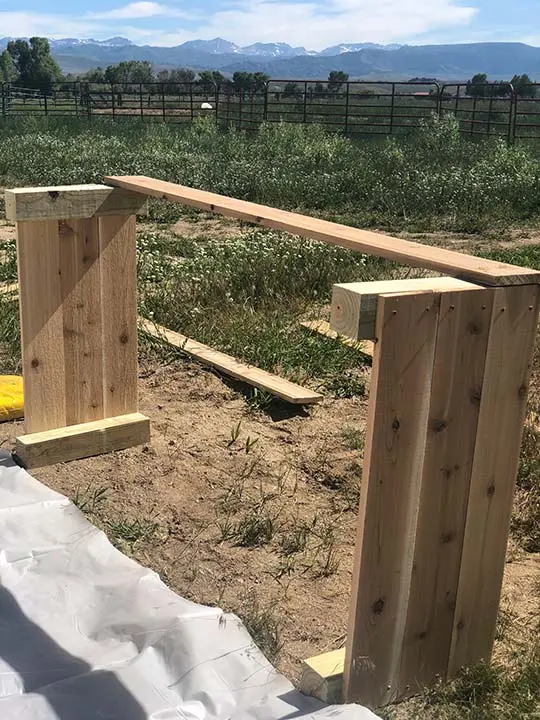
Now that you have your short sides built, place them on their sides (feet going the same direction) and start attaching the long boards, starting with the top board.
My tip for this part is start on one side, making sure the post is even and butting up against the other board, drill your hole and then add the screw. Line up the other side and drill in the top board. Now you can add the two other boards, flip and repeat!


DIY Raised Garden Beds
Now that I have my Garden Thyme Greenhouse from Montana Shed Center all set up and growing pretty flowers and vegetables its time to move on to the outside! I have always wanted raised garden beds, as they do very well here in Wyoming.
Materials
- 6 1x6x6
- 6 1x6x3
- 4 4×4 cut 18 inches
- Exterior wood screws (I went with 9x2s)
- 6 1×2 cut 12 inches (this is to attach to the inside to support the boards)
Tools
- Drill/ driver
- Chop Saw (this one is optional! If you do not own one or you aren’t comfortable, the lumber yard can help with cuts!)
- Nail gun (or you can use a hammer and some brad nails)
Instructions
Once you’ve got all of your wood cut, lay your 4x4s out next to each other and space them apart. We are going to start with our 3ft sides first. Place the 1x6x3 boards across the 4×4 posts with the 4×4 posts on either end of the boards (see picture below)
Make sure your boards are even and the 4×4 is even with the ends of the board. Start with your top board, drill your holes first, this prevents splitting, then drill in your screws. I use 2 screws on each side of the boards.
Repeat with the two others below the first board. You will see the 4×4 is extended past the boards at the bottom, this is to allow you to set the bed where you want and the “feet” will stay in place.
Now that you have your short sides built, place them on their sides (feet going the same direction) and start attaching the long boards, starting with the top board.
My tip for this part is start on one side, making sure the post is even and butting up against the other board, drill your hole and then add the screw. Line up the other side and drill in the top board. Now you can add the two other boards, flip and repeat!
Make sure you start with the top board again for the last side, work on drilling it on the one side and making sure it’s even and then go to the other side.
You now have a built garden bed! Good job! Take your 1×2 and place them on the inside across the three boards and nail them in. I use my Brad nailer for this and the point of the 1×2 is to stabilize the boards.
Place your bed where you want it and get it filled! Tips for filling is apply a weed liner at the bottom and fill with sticks and cardboard and then dirt!