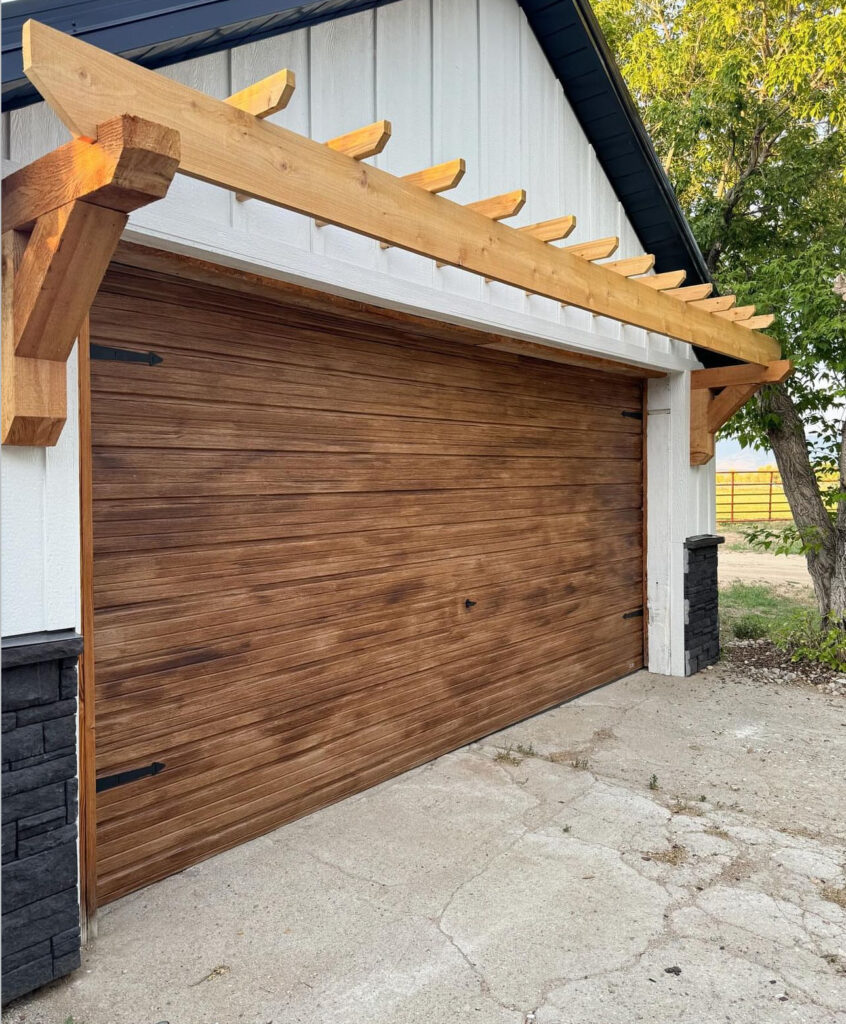
Transforming the exterior of your home doesn’t always require major renovations. A DIY garage pergola over your garage door is an excellent way to add charm, curb appeal, and even some functional shade. This project can be completed over a weekend with basic tools and materials, making it an ideal DIY venture for those looking to enhance their home’s facade. Here’s a step-by-step guide to building your own garage pergola over your garage door.
Why Build a Garage Door Pergola?
A pergola over your garage door can offer several benefits:
- Curb Appeal: It provides an architectural feature that instantly elevates the aesthetic of your garage, giving your home a more polished and welcoming look.
- Shade: By adding a pergola, you can create some shade over your garage door, which can help reduce the amount of heat that enters your garage.
Planning Your Garage Door Pergola
Before diving into the project, careful planning will ensure the best results. Here are some important factors to consider:
- Dimensions: Measure the width of your garage door to determine the size of your pergola. It’s typically best to extend the pergola a foot or two beyond the edges of the garage door for a balanced look.
- Style and Design: Choose a pergola design that complements the style of your home. Whether you prefer a sleek modern look or a more traditional design, your pergola should blend seamlessly with the overall architecture of your house.
- Materials: Cedar, redwood, or pressure-treated wood are popular choices for outdoor structures because they resist weathering and insects. You can also opt for vinyl or metal if you want a more low-maintenance option.
Tools and Materials You’ll Need
- Materials:
- 4×4 or 6×6 wood posts for vertical supports
- 2×6 or 2×8 beams for the horizontal structure
- 2x4s for cross rafters
- Wood screws or lag bolts
- Brackets for securing the pergola to the garage wall
- Weatherproof wood stain or paint
- Climbing plants (optional)
- Tools:
- Drill and bits
- Measuring tape
- Circular saw
- Level
- Ladder
- Hammer and nails
- Safety equipment (goggles, gloves, etc.)
Step-by-Step Instructions
1. Measure and Plan
Start by measuring the width of your garage door and deciding how far you want the pergola to extend out from the wall. A typical depth is between 2 to 4 feet, but you can adjust based on your preference.
2. Install the Wall Brackets
Secure metal or wooden brackets to the garage wall where the pergola will be attached. Make sure to anchor them into studs for stability. Use a level to ensure that the brackets are perfectly straight. These brackets will support the weight of the pergola beams.
3. Attach the Horizontal Beams
Cut the horizontal beams to your desired length and attach them to the wall brackets. These beams will run parallel to the garage door. Use lag bolts or wood screws to secure them firmly to the brackets. Make sure they are level.
4. Install the Rafters
Cut your rafters (2x4s) to the length needed for the depth of the pergola. Space them evenly across the horizontal beams, typically 12 to 24 inches apart, and attach them with screws or nails. You can use decorative rafter tails or notches to add character to your pergola design.
5. Add Finishing Touches
Sand any rough edges on the wood and apply a weatherproof stain or paint to protect the pergola from the elements. Consider adding climbing plants, like wisteria or jasmine, to grow along the pergola and add a natural touch to your garage.
Optional: Lighting and Accessories
- Lighting: String lights or outdoor pendant lights can be added to create a cozy ambiance for evening hours.
- Planters: Hanging planters or attached flower boxes can add even more greenery and life to your pergola.
Maintenance Tips
- Weatherproofing: Regularly check the stain or paint on your pergola and reapply as needed to protect the wood from sun and rain damage.
- Check Fasteners: Periodically inspect the screws, bolts, and brackets to ensure that everything remains secure and in good condition.
DIY Garage Pergola

If you’re looking to add a touch of charm and functionality to your home, a DIY garage pergola might be the perfect project for you. Not only does it provide a stylish architectural element, but it also extends your outdoor living space. Whether you want to create a cozy nook for relaxation or a spot to showcase your favorite plants, building a pergola can transform the look and feel of your garage. Here's a comprehensive guide to help you create your own DIY garage pergola.
Materials
- 4x4 or 6x6 posts (depending on the height and sturdiness required)
- 2x6 or 2x8 beams for the cross-supports
- Wood screws or bolts
- Concrete for anchoring posts
- Stain or paint (optional)
Tools
- Circular saw or handsaw
- Drill and bits
- Measuring tape
- Level
- Post hole digger
- Hammer and nails
- Safety gear (gloves, goggles, etc.)
Instructions
1. Measure and Mark the Location
Measure the area where you plan to build the pergola. Mark the spots where the posts will be placed, ensuring they are evenly spaced and aligned with the garage.
2. Dig Post Holes
Use a post hole digger to dig holes for the pergola posts. The holes should be about 2-3 feet deep, depending on your local frost line and the height of your pergola.
3. Set the Posts
Place the posts in the holes and fill them with concrete. Ensure the posts are level and allow the concrete to cure for at least 24 hours before proceeding.
4. Install the Cross Beams
Once the posts are secure, attach the cross beams using wood screws or bolts. The beams should run parallel to the garage and be securely fastened to the posts.
5. Attach the Rafters
Install the rafters perpendicular to the cross beams, spacing them evenly along the length of the pergola. These will form the "roof" of your pergola and provide support for climbing plants or other decorative elements.
6. Add Finishing Touches
Sand down any rough edges and apply a stain or paint if desired. You can also add accessories like string lights, outdoor curtains, or lattice panels to complete the look.
Notes
Tips for Success:
Pre-cut Materials: Have your wood pre-cut at your local hardware store to save time and ensure accuracy.
Weatherproofing: Use weather-resistant materials and sealants to prolong the life of your pergola.
Test Fit: Dry fit all your pieces before securing them to ensure everything aligns correctly.