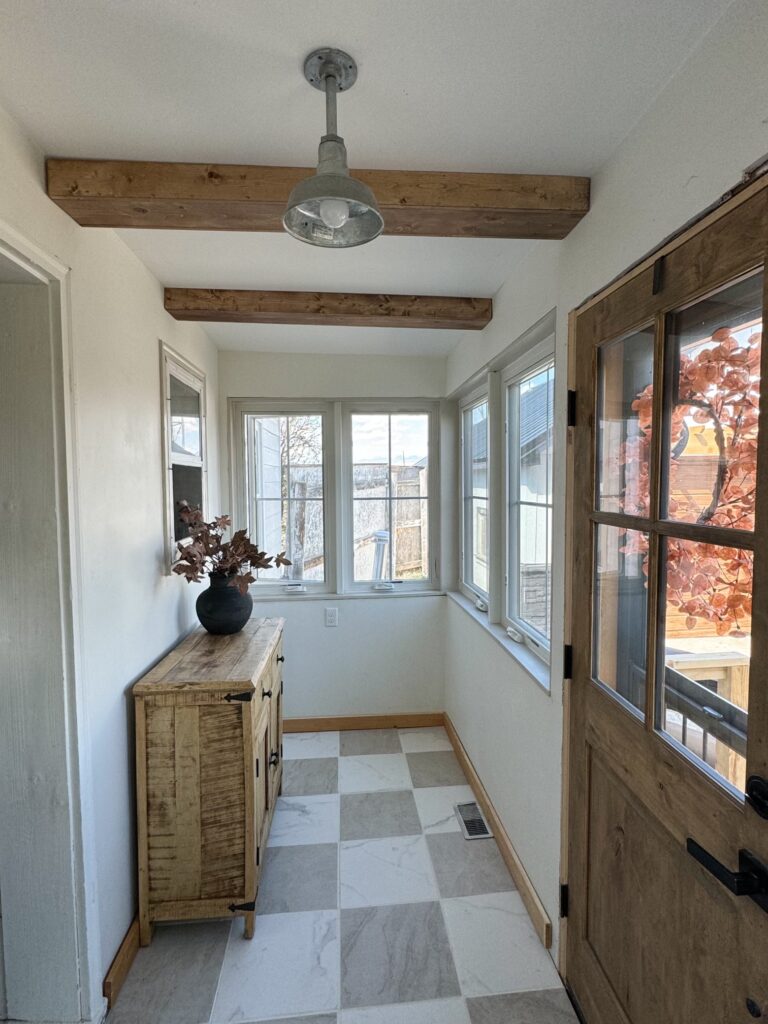
Looking to add a touch of rustic warmth to your home without breaking the bank? Faux wood beams are the perfect way to do that! They offer the visual appeal of authentic wood without the hefty price tag or complicated installation. In this blog post, I’ll walk you through a step-by-step guide on how to create and install DIY faux wood beams that will instantly elevate the charm of your space.
What You’ll Need:
To get started on your faux wood beams, gather these materials and tools:
- 1×4, 1×6 and/or 1×8 planks (depending on your desired beam size)
- Wood stain or paint
- Wood screws or nails
- Wood glue
- Sandpaper or electric sander
- Miter saw or circular saw
- Tape measure
- Stud finder
- Drill
- 2×6 or 2×8 (this is your cleat)
Step-by-Step Guide to DIY Faux Wood Beams
Step 1: Measure Your Space
Start by measuring the area where you want to install your faux wood beams. Be sure to measure the length of the ceiling, and plan out how many beams you want to install and how far apart they should be.
Step 2: Choose Your Materials
For faux wood beams, you can use MDF, plywood, or pine boards. I used pine boards and used 1×4 for the sides and a 1×6 for the bottom. You’ll need to cut these boards to create a 3-sided box that will be the “beam.”
Step 3: Cut the Boards
Using a miter saw, cut your boards to the appropriate length for each beam. You’ll need three pieces per beam: two for the sides and one for the bottom. If you want the beams to have a seamless look at the corners, cut the edges at 45-degree angles.
Step 4: Assemble the Beam
Lay out the boards on a flat surface to form the beam. Apply wood glue along the edges and then attach the boards using wood screws or nails. Make sure the sides are flush and straight. Sand down any rough edges for a clean finish.
Step 5: Stain or Paint
Once your beam is assembled, it’s time to stain or paint. Choose a wood stain that mimics the color of natural wood, or go for a custom paint color that matches your home décor. Apply one or two coats, allowing drying time between each coat. Sand lightly between coats if needed.
Step 6: Install the Beams
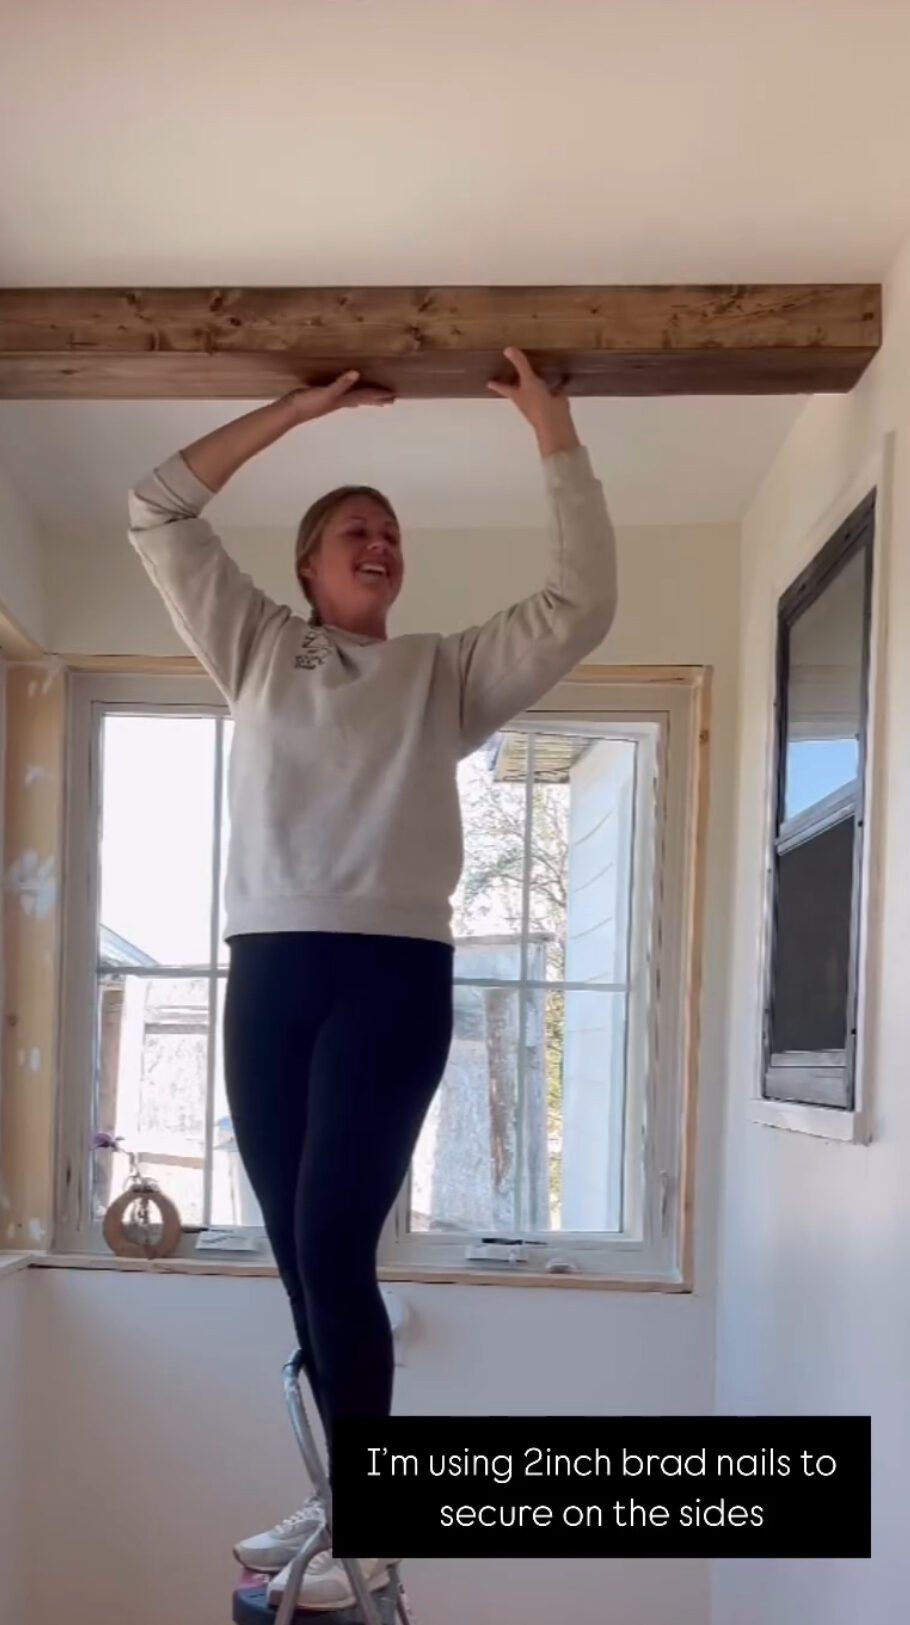
To install the beams, use a stud finder to locate the ceiling joists where your beams will be mounted. I evenly spaced out where my beams would go and I then screwed the 2×6 to the ceiling (these are your cleats). Then, carefully lift the faux beam and attach it to the brackets using screws. You may need an extra set of hands for this step.
Step 7: Final Touches
Once the beams are securely mounted, check for any gaps between the ceiling and the beam. You can fill these gaps with caulk or wood filler, then touch up with paint or stain to make the beams look seamlessly integrated into the ceiling.
DIY: Faux Wood Beams

Looking to add a touch of rustic warmth to your home without breaking the bank? Faux wood beams are the perfect way to do that! They offer the visual appeal of authentic wood without the hefty price tag or complicated installation. In this blog post, I’ll walk you through a step-by-step guide on how to create and install DIY faux wood beams that will instantly elevate the charm of your space.
Materials
- 1x4, 1x6 and/or 1x8 planks (depending on your desired beam size)
- Wood stain or paint
- Wood screws or nails
- Wood glue
- 2x6 or 2x8 (this is your cleats)
Tools
- Sandpaper or electric sander
- Miter saw or circular saw
- Tape measure
- Stud finder
- Drill
Instructions
Step 1: Measure Your Space
Start by measuring the area where you want to install your faux wood beams. Be sure to measure the length of the ceiling, and plan out how many beams you want to install and how far apart they should be.
Step 2: Choose Your Materials
For faux wood beams, you can use MDF, plywood, or pine boards. I used pine boards and used 1x4 for the sides and used a 1x6 for the bottom. You’ll need to cut these boards to create a 3-sided box that will be the "beam."
Step 3: Cut the Boards
Using a miter saw, cut your boards to the appropriate length for each beam. You’ll need three pieces per beam: two for the sides and one for the bottom. If you want the beams to have a seamless look at the corners, cut the edges at 45-degree angles.
Step 4: Assemble the Beam
Lay out the boards on a flat surface to form the beam. Apply wood glue along the edges and then attach the boards using wood screws or nails. Make sure the sides are flush and straight. Sand down any rough edges for a clean finish.
Step 5: Stain or Paint
Once your beam is assembled, it’s time to stain or paint. Choose a wood stain that mimics the color of natural wood, or go for a custom paint color that matches your home décor. Apply one or two coats, allowing drying time between each coat. Sand lightly between coats if needed.
Step 6: Install the Beams
To install the beams, use a stud finder to locate the ceiling joists where your beams will be mounted. I evenly spaced out where my beams were going to go and then screws my 2x6 to the ceiling (this is your cleat that the box will wrap around). Then, carefully lift the faux beam and attach it to the brackets using screws. You may need an extra set of hands for this step.
Step 7: Final Touches
Once the beams are securely mounted, check for any gaps between the ceiling and the beam. You can fill these gaps with caulk or wood filler, then touch up with paint or stain to make the beams look seamlessly integrated into the ceiling.
Notes:
Some notes on things I did for our project!
- I did sides 1X4 and the bottom 1X6.
- I used a 100 grit to sand off the “sheen” on the pine I used.
- Since my bottom piece is 1X6 I used a 2X6 that I screwed in 3inch screws at an agle to secure to the ceiling.