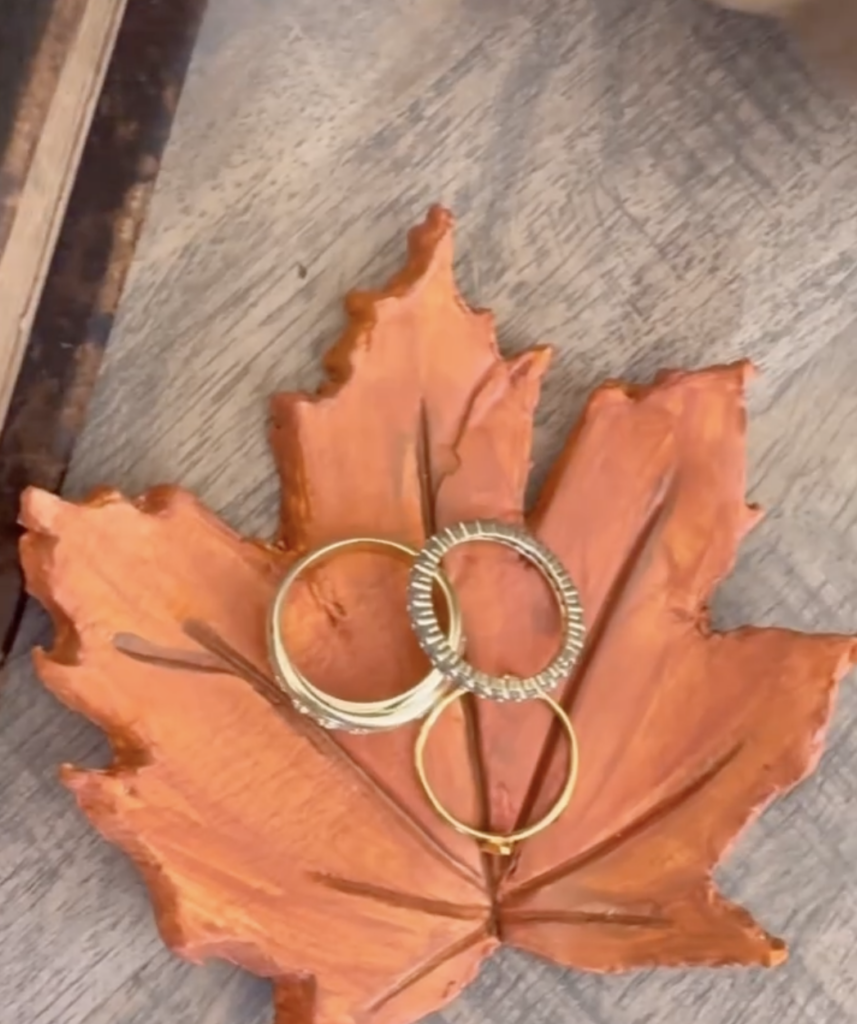
Fall is the perfect season for cozy crafts, and this DIY maple leaf bowl is such a beautiful way to bring autumn into your home. Made with just a few simple supplies, this project uses air-dry clay and real maple leaves to create a delicate little dish that’s perfect for holding jewelry, trinkets, or simply displaying as seasonal décor.
Supplies You’ll Need
- Air-dry clay
- A maple leaf (choose one with defined veins)
- Rolling pin
- Toothpick or clay tool
- Large spoon (or anything curved to shape the bowl)
- Paint (acrylic works great)
- Paintbrush
- Mod Podge or sealer (optional for a glossy finish)
Step 1: Roll Out Your Clay
Take a small portion of air-dry clay and roll it out flat, about ¼ inch thick. Make sure it’s big enough to fit your maple leaf.
Step 2: Press the Leaf
Place your maple leaf on top of the clay, vein side down, and gently press it in. You want those beautiful lines to transfer into the clay.
Step 3: Cut the Shape
Using a toothpick, carefully trace around the edges of the maple leaf. Remove the excess clay so you’re left with a perfect clay leaf shape.
Step 4: Shape Into a Bowl
Lay your clay leaf inside a large spoon (or over the back of one) to give it a soft, curved bowl effect. This step adds dimension while still keeping it functional as a small dish.
Step 5: Let It Dry
Allow the clay to dry completely—this usually takes 24–48 hours depending on the brand and thickness. Once dry, it will be sturdy and ready to decorate.
Step 6: Paint Your Bowl
Paint your leaf bowl however you’d like! You could go classic with warm fall tones like gold, copper, or red, or opt for a chic solid color like white for a minimalist look. If you’d like it shiny and durable, seal it with Mod Podge or a clear coat once the paint dries.
Display & Enjoy
Your maple leaf bowl is ready to use! Place it on your nightstand to hold jewelry, on your entryway table for keys, or simply display it as a charming piece of handmade autumn décor.
This craft is simple, budget-friendly, and the results are stunning. Plus, it makes a thoughtful handmade gift if you want to share a little piece of fall with someone special.
DIY Air-Dry Clay Maple Leaf Bowl

Fall is the perfect season for cozy crafts, and this DIY maple leaf bowl is such a beautiful way to bring autumn into your home. Made with just a few simple supplies, this project uses air-dry clay and real maple leaves to create a delicate little dish that’s perfect for holding jewelry, trinkets, or simply displaying as seasonal décor.
Materials
- Air-dry clay
- A real maple leaf (choose one with defined veins)
- Rolling pin
- Toothpick or clay tool
- Large spoon (or anything curved to shape the bowl)
- Paint (acrylic works great)
- Paintbrush
- Mod Podge or sealer (optional for a glossy finish)
Instructions
Step 1: Roll Out Your Clay
Take a small portion of air-dry clay and roll it out flat, about ¼ inch thick. Make sure it’s big enough to fit your maple leaf.
Step 2: Press the Leaf
Place your maple leaf on top of the clay, vein side down, and gently press it in. You want those beautiful lines to transfer into the clay.
Step 3: Cut the Shape
Using a toothpick, carefully trace around the edges of the maple leaf. Remove the excess clay so you’re left with a perfect clay leaf shape.
Step 4: Shape Into a Bowl
Lay your clay leaf inside a large spoon (or over the back of one) to give it a soft, curved bowl effect. This step adds dimension while still keeping it functional as a small dish.
Step 5: Let It Dry
Allow the clay to dry completely—this usually takes 24–48 hours depending on the brand and thickness. Once dry, it will be sturdy and ready to decorate.
Step 6: Paint Your Bowl
Paint your leaf bowl however you’d like! You could go classic with warm fall tones like gold, copper, or red, or opt for a chic solid color like white for a minimalist look. If you’d like it shiny and durable, seal it with Mod Podge or a clear coat once the paint dries.